[精华]罗宾逊直升机R22 Preflight(一)2016-06-06 17:59:50
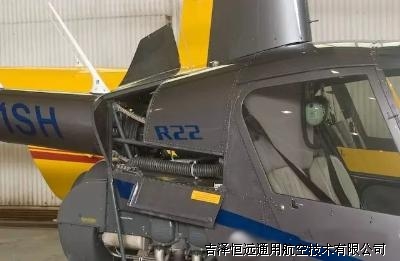
简述 || 宣传航空文化,我们是认真的!在路上,因为共同的爱好而走到一起,因为相互的支持而走的更久远,从点滴做起,用实际行动把飞行的文化传播给更多的朋友,共筑中国梦,航空梦。 Cowl Door

Cowl Door
Start on the right side of the helicopter. On an R22 with an auxiliary fuel tank, you'll see two doors. Open both of them:
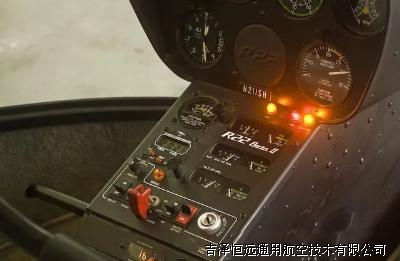

Master switch on
Oil pressure, alternator, governor lights: On
Warning light test switches: Push To Test
At the bottom, you'll see a small panel of push buttons:
Push each one of these in turn. The corresponding light in the cockpit will light up. This lets you check that the lightbulb and wiring harness work. It does not check that the actual sensor works. In the case of the low fuel light, on newer helicopters you have to push and hold the button for a couple seconds before the light comes on. Pilots often give up on the light too soon and release the button just before the light would have come on.
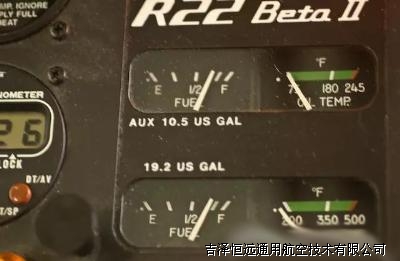
Fuel Quantity: Check Gages
Master Switch: Off
Aux Fuel Tank Quantity: Check
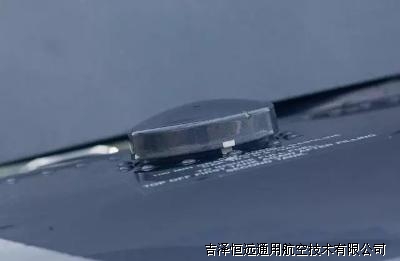
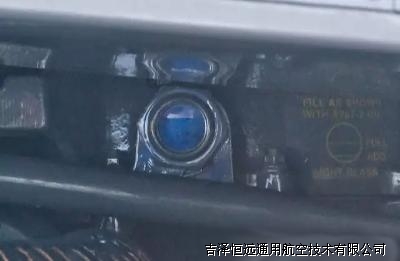
Fuel Filler Cap: Tight
The fuel cap has a line painted on it, as does the fuselage: Make sure that the two paint strips are lined up - this tells you that the cap is on tight. Some older R22s had a chain to connect the gas cap to the fuselage, so that the cap would not get loose. The problem with those is that if you forget to put the gas cap back on, it bangs around and dents the outside of the fuel tank terribly. It's better to just lose the cap so the chain has been gone for some time now.
Aux Fuel Tank: No Leaks
Aux Fuel Drain: Sample
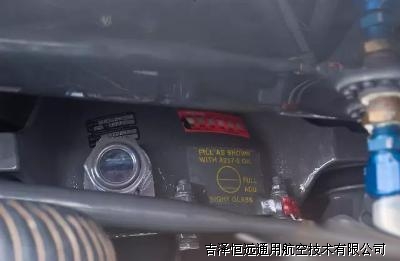
Gearbox Oil: Full, No Leaks
The sight glass lets you verify the amount of oil in the transmission. If you look to the right edge of the picture, there is a yellow decal which shows you what the level should look like. Unlike an automobile engine, the transmission oil does not get used up, so if the level is going down over time there is probably a leak. That would not be typical: usually there is no leak and you never have to add oil. If you have to add oil on a regular basis, you need to have your mechanic look into what is going on.
Another thing to check is the color of the oil. As you can see in the picture, the oil is blue. If the oil appears to be a muddy brown, that generally means that water is getting into the oil. The typical way that this occurs is through the hollow rotor mast, either because he aircraft is being left out in moist conditions, or someone is spraying water into the rotor head during washing of the helicopter. It's not great, and you might want to flush the oil at some point, but I have seen plenty of R22s with muddy brown transmission oil.


Rotor Brake: Actuation Normal
Flex Coupling: No Cracks, Nuts Tight
Yoke Flanges: No Cracks
Gearbox Teletemp: Normal
In the above picture, above the yellow decal you can see an orange strip of paper on the transmission. This is a Teletemp. The purpose of the teletemp is to record the highest temperature the part has reached. Different teletemp strips are rated for different temperature, so you can't mix and match them. When the helicopter component reaches a particular temperature, all the teletemp boxes below that temperature will turn black and stay that way permanently. In the photograph above, you can see that none of the boxes have turned black yet. A mechanic has put a black pen mark to the left of all the boxes to indicate that when he inspected the component none of the boxes had turned black. If a mechanic or a pilot sees more boxes turn black, it is an indication that the part is running hotter than in the past. A new mark would be made to record this new temperature, and the person needs to ask themselves whether this is explainable. If the helicopter was working on a hot summer day, or was using a lot of power, this might explain the transmission running hotter, and thus might not need any more attention. On the other hand, if there were no conditions that would explain the increased temperature, it might make sense for a mechanic to look into the situation.
Sprag Clutch: No Leaks
The name "clutch" is confusing to many people flying the Robinson helicopters, because there are two clutches that we commonly talk about, although they perform different jobs. The clutch that we engage during startup is a system which jacks up the upper pulley until the belts have sufficient tension to turn the rotor system. The other clutch that we talk about is the "sprag clutch" which is built into the hub of the upper pulley. On some other helicopters, this is called the freewheeling unit, which I think is a better name as it describes what it does.
The purpose of the sprag clutch is to let the rotor continue to turn if the engine should fail. In the Robinson, it is built into the hub of the upper pulley, and is filled with oil. If you look at the hub and see an oily liquid on the face of the pulley, chances are the seal is broken. You would want a mechanic to check it out before you fly it.
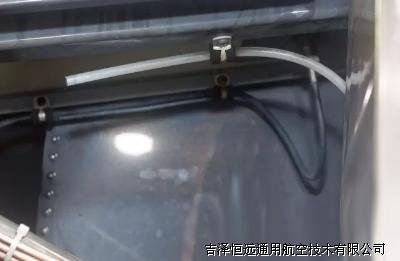
Static Source: Clear
At the top of the cowling area you will see the static source. This measures the static pressure inside the helicopter fuselage. The static system is connected to the Altimeter, VSI, and Airspeed indicator. You want to check that nothing is blocking the tube - insects would be a big concern, but I suppose other things could get lodged inside the tube. Anything that prevents the free flow of air in the tube would cause the flight instruments to read iincorrectly.
Control Rod Ends: Free Without Looseness
Steel Tube Frame: No Cracks
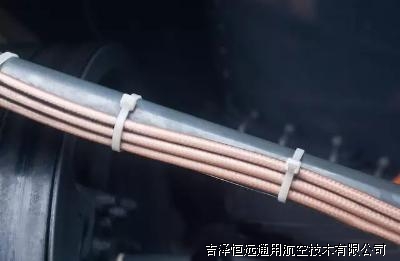
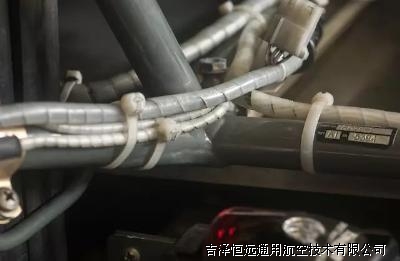
All Fasteners: Tight
You will find a great many tie wraps throughout the helicopter. Their job is to make sure things are not flopping around where they can interfere with rotating components. Check that they all appear intact, and if you find one that has been removed by a mechanic you may want to check whether he meant to replace it and simply forgot. I suppose they could get brittle and break on their own, but I've never seen that happen, so it's not very likely.
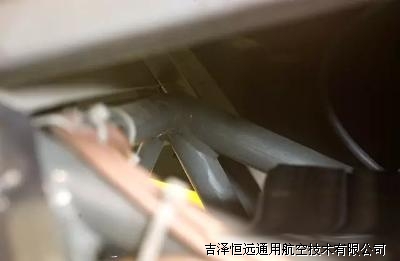
Tail Rotor Control: No Interference
In this photo you can see the tail rotor control push/pull tube connected to a pivot by a spherical bearing with a torque striped pal nut. Make sure the pal nuts are in place and tight.
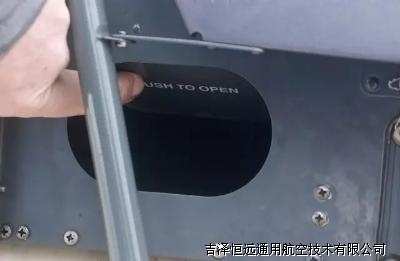
Cowl Door: Latched
Make sure both doors are closed and latched - check that the three latches are fully clockwise - they should be horizontal.
Engine Right Side
Engine Right Side
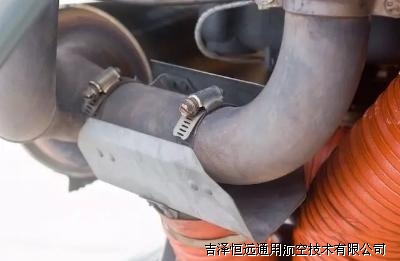
Carb Air Ducts: Secure
This is the cold air carburetor air duct. On the inside of the sheet metal (difficult to photograph) a hose clamp holds the flexible orange hose onto the duct. Examine the hose clamp and even give it a little wiggle to make sure that it is firmly attached. Don't yank on it so hard that you bend the metal wire inside the orange hose, or risk pulling the hose out of the hose clamp, but you can make sure that it is attached firmly.
The orange hose has a wire in it to maintain it's shape. If the internal wire corrodes it can eventually break and allow the hose to collapse. Examine the entire hose and make sure that it has a good cylindrical shape throughout the entire length of the hose. If it looks irregular, have a mechanic check it out. This goes for all the similar hoses leading to the carburetor air box.
Carb Heat Scoop: Secure
This is a picture of the carburetor hot air scoop on a Beta II. This is a much better design than on the O320 R22s in my opinion. It is easier to inspect, and is not in close proximity to any oil lines. You can easily see and inspect the host clamps that attach it to the exhaust system.
On the earlier R22 models, the carburetor heat scoop goes very close to an oil line. If a mechanic reinstalls it rotated slightly, it will cut through the oil line. This actually happened to me, but a student caught it during preflight - there was a puddle of oil under the helicopter. Coincidentally, Robinson published a notice the following week warning about that exact situation. Not in time to prevent problems for that aircraft, but indicative that it was a fairly common problem. This also points out the effectiveness of watching for puddles of fluid under an aircraft - I've seen several problems that might have been missed on preflight -- cut oil lines, cracked blade boots, etc. discovered because of the puddle of fluid under the part in question.
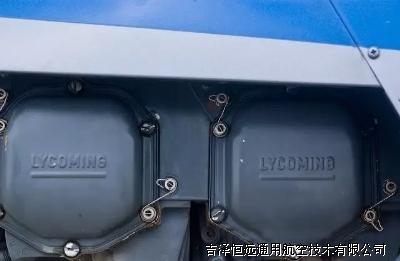
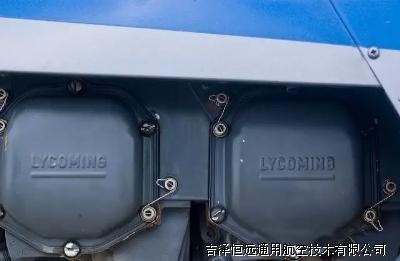
Engine Sheet Metal: No Cracks
All around the engine there is sheet metal designed to conduct cooling air around the engine, especially the cylinder heads. This sheet metal has always been a bit of a weak part in the R22 design: it is not uncommon to find cracks which must be stop drilled. The part to look for is not the metal with "Lycoming" stamped on it - it's the metal between those two valve covers. That metal extends all around the engine, and you want to give it a good look over with a flashlight to see in the dark corners on a frequent basis because there will eventually be some cracks!
While not a significant threat to safety, if the cracks should propagate until a part of the sheet metal falls off, the engine will not receive sufficient cooling and you'll risk a hot cylinder that might eventually manifest itself as engine difficulties.


Electrical Terminals: Tight
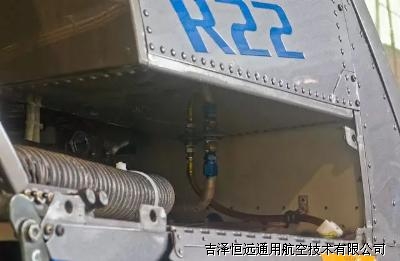
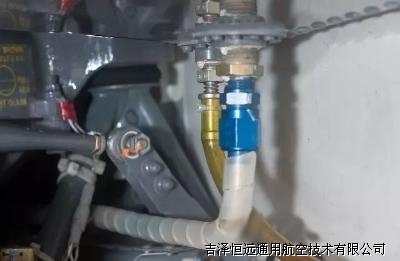
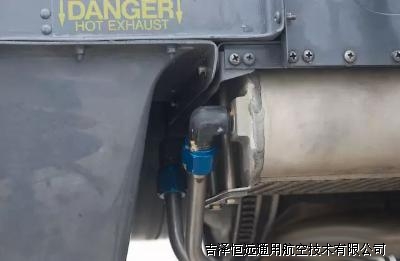
Fuel Line: No leaks
There are two fittings visible in the picture. The one with the yellow tube on it is the fuel drain. The one with the blue fitting is the cross feed that connects the right and left fuel tanks together. Check that there is no fuel leaking from either fitting, and no fuel is dripping from the bottom of the tank.
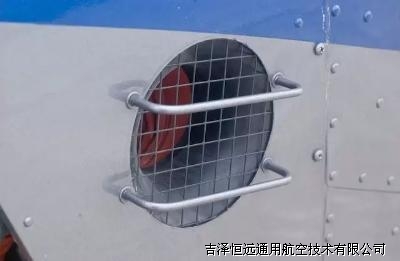
Oil Cooler Door: Check
Open the oil cooler door (which is spring loaded) and check for debris. Here in New England we get lots of leaves sucked into the oil cooler when they fall off the trees in autumn. Also, when the grass has been cut we tend to suck a fair amount of that into the oil cooler. A few strands of grass isn't going to effect the efficiency much, but a big leaf will. Just reach in and pull out any stuff you find on top of the oil cooler.
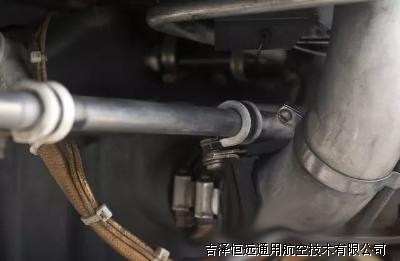
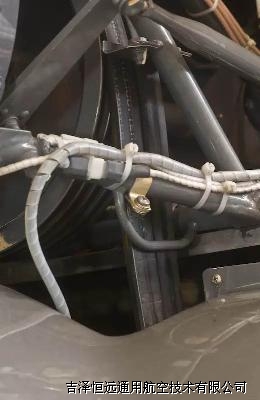
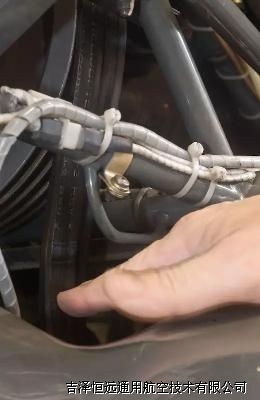
Oil lines: No leaks or chafing
The two blue fittings coming out of the oil cooler are the oil lines. They travel up the length of the engine:
Notice how all the attach points for the oil lines have rubber and plastic composition. This is because any metal touching the oil line will eventually cut through it due to vibration. Make sure that nothing is touching the oil lines without a rubber or plastic protective device.
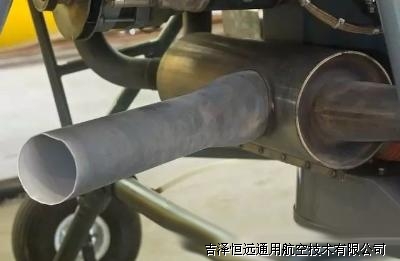
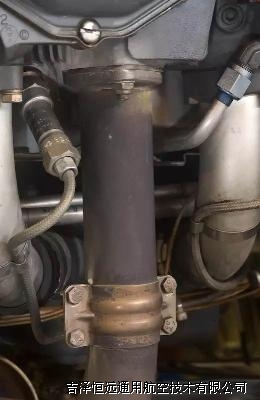
Exhaust System: No cracks
Grab the exhaust pipe and give it a little shake to make sure that everything is secure. Note that this R22 has the heater muff attached so you should also check that the sheet metal is not cracked, and that all the screws along the bottom are intact.
Likewise check that the gaskets are not leaking exhaust gasses. As you can see in this photo, it's common to get a little exhaust leak around the lower bracket where the two halves of the bracket connect. That's nothing to worry about.


Engine General Condition: Check
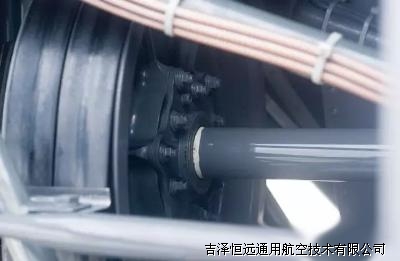
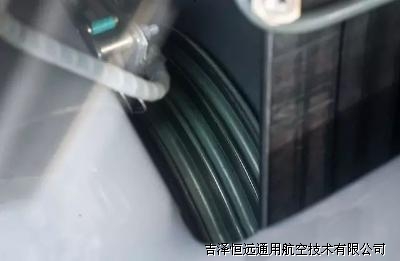
V-belt Condition: Check
Check the condition of the belts. There are a couple of schools of thought on the proper way to do this. One guy I worked with years ago had the belts break, and after that he always religiously turns the belts by hand so that he can inspect every inch.
The downside of this is that you get black belt dust all over your hands, so I just inspect the belts without turning them. If you look at the top and the bottom on both the left and right side of the helicopter, you can probably see about 80% of the belt area, so it's a fairly complete inspection.
In this picture you can see the outside surface of the V-belt, but not really the inside surface which mates with the upper and lower pulleys. To do a good inspection of the inside of the belt often requires a flashlight, and you won't see nearly as much as the exterior of the belt.
Robinson also recommends that you check the wear on the upper and lower sheave to make sure that the belts are riding correctly on them, and that no foreign objects have fallen in and been caught between the belts and the pulleys.
V-belt Slack: Check
Sprag Clutch: No leaks
This is the same check as we did earlier, except that check was on the front side of the upper sheave, and this is on the rear side. Since there is a seal on both front and rear, you need to check both sides.
Upper Bearing: No leaks
Check that the bearing is not pushing an unreasonable amount of grease out. If it has just been serviced, it may have some grease, but if you wipe it and you keep getting more it may be an indication of a problem.
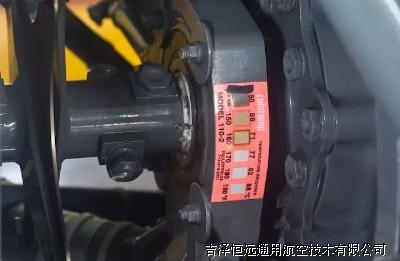
Teletemp - Upper Bearing: Normal
This is a good view of the upper bearing and the associated teletemp. Note that one square is black, and two squares are sort of a yellowish brown. This is not an indication that the part was approaching 160 degrees F, because in that case the 150 square would be dark. Instead, this is probably caused by some contamination of the teletemp material.
Lower Sheave Groove Wear: Smooth & Uniform
Check that the wear marks are uniform, an indication that the belts are all aligned identically. Also check that there are no dents or other blemishes on the pulley that might indicate someething fell in and was crushed between the belts and the pulley.
Flex Coupling: No cracks, Nuts tight
Yoke Flanges: No cracks
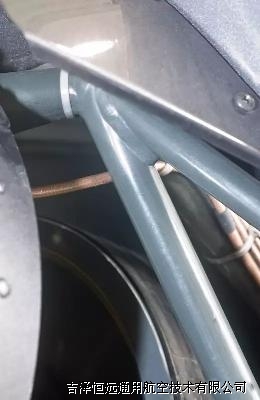
Steel Tube Frame: No cracks
Look at each place where the frame is welded and check for cracks. In the above picture, you can see that an extra gusset was added to strengthen the weld. Early on, the R22s were experiencing cracks in this area, probably because of the vibration from the tail rotor.
Another example of a weld to check, this one on the upper part of the frame.

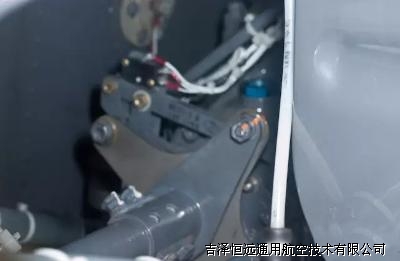
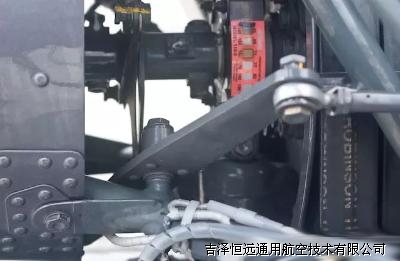
Tail Rotor Control: No interference
The bell-crank in this picture is part of the tail rotor control push/pull rods. Grab hold of it with your hand and work the control forward and back and make sure that nothing is interfering with the free movement of the tail rotor controls. Notice the rear flex coupling is just above the inner portion of the bell-crank. Many years ago I flew one helicopter that was improperly rigged such that the flex coupling could descend and hit the tail rotor bell-crank when the clutch was in the disengage position. If you held the pedals in just the right position during shutdown in that aircraft you would hear "tick, tick, tick" as the flex coupling was hitting the bolt on the bell-crank!
未完待续...